Pages

Tuesday, July 19, 2011

CTMH Birthday Stamps


What fun this was! New set from CTMH, my first use. I will be using this more. Sometimes it is hard to make a birthday card for someone--not always knowing their likes and dislikes. For instance my Sunday School class-You ROCK Bridgebuilders!!

I am actually thinking of trying to make this for s "man" card using browns, blacks and tans and leaving off the flowers on top. What do you think?

I stamped the image in a light Hollyhock ink from CTMH. Then used CTMH markers and Marvy markers to color it in. After it dried I drug the edges through and along the Hollyhock ink pad. Next, I added Diamond Glaze to two layers of the cake and also covered the plate and allowed to dry.

Stamp the pink cardstock with a small flower to give depth in the Hollyhock ink.
I attached the cake to an extra piece of green patterned paper and then attached all to the pink stamped cardstock. Add a pink gingham checked ribbon from CTMH and you are done.

The stamp set includes a couple of sayings which I used on the inside. I added white paper to the inside and stamped in Hollyhock ink:
You're the Sweetest Thing
Happy Birthday

Enjoy!!

Wednesday, July 13, 2011

Viva Las Vegas Stamps


Love my new stamps that I purchased from VLVS. The three stamps are all Oriental and this is the first one I have used.

For the card base I used my Cuttlebug to emboss vines and birds to compliment the little girl holding the bird. On white paper I stamped the child with my Staz-On black ink.

Colored the images with markers from Marvy. I stamped the image once again to create a mask and cut out. I added Zig glue to the back of the mask and allowed it to dry.
By covering up the colored image I was able to use another stamp of flowers by Stampin Up to create a background. Then colored the flowers in lightly to compliment the child. I used an additional unknown designer stamp in oriental nature to add small images to the open areas and used a sponge to highlight the borders. Glued the finished image to a piece of the same colored paper allowing about a 1/16 th border around it. Then glued this to the embossed card base. Added a multi colored ribbon making a double bow so that it appears to look like a dragonfly.

Hoping you enjoy my newest creation.

Nancy

Tuesday, April 12, 2011


Don't you just wish you lived in the time of this 'Lady in Red'. I as just crazy about her clothing. Stamped her in black Staz-on and coated with clear embossing powder. Then colored with my Tombow markes.

Now all I need is her figure to put into those clothes.

Fairy Thank You


I love this little fairy from CTMH. She is so versitale and adorable. The teal paper is from he Dollar Tree. Wish I could get some more of it.

Enjoy

Nancy

Wednesday, April 6, 2011

Chunky City Rabbit


I made this rabbit out of a wooden block left from unmounting a rubber stamp. What fun!! let your mind fly. I have so many of these blocks left over..it is also addicting. Actually I made a whole easter parade.

If you would like to see exactly how I made this rabbit and the rest of the wooden blocks please visit Rubber Road Adventures, an online magazine that I design for.
http://rubberroadadventure.ning.com


Check out the Rubber Road and see many of my projects.

Stamping in the Fort

Nancy

Tuesday, March 15, 2011

Faerie Rider


The stamped Fairy is from Faerie Song Stamps. She is riding a dragonfly and I wanted her on my front door. She is so welcoming and inviting to friends and neighbors.

I stamped the fairy several times, cut her out and then glued the multiple layers together with Diamond Glaze. This created a very stiff image to be added to the message or flower holder for my front door. The Diamond Glaze helped to seal the project and keep sweating of the inner door from bothering the design. Then I colored her with my Marvy markers.


I stamped images of leaves on the holder and then added a few others with my paintbrush.


Won't you leave me a note or just ring the bell for a cup of tea!

Monday, March 14, 2011

Tiger in Purple


A Purple Tiger-oh my! Yes here is one stamped in Staz-On black and embossed. This stamp is from Art Neko. What a great image. I added purple highlights with my Marvy markers to accentuate his coloring. The oriental stamped word from Art Neko is "Tiger".

File Folder Booklet

Making a file folder book is awesome. Your ideas are pushed to limits, you think, and then something else just pops right up. Art- what an interesting word- it is complex and all encompassing. See the file folder book I created about ART.
You can see the complete details of how to create this booklet on Rubber Road Adventures. Here I am sharing just the simple instructions on how to create and add stamped images and your artwork.

The File Folder Book once folded contains four pockets to hold stamped images on tags as I have done or you might want to include pictures of childern, new home or photos of your pets.


These are the tags I created. All having to do with art.


The next two photos are the insides of the File Folder Book showing the stamped images on the front of the pockets.


The last photo is the back of the File Folder Book. This is so enjoyable to create I am hoping you will take the time to create one of your own.

Gesso & Pearl Ex


What do you get when you mix Gesso and Pearl Ex? Ahh an interesting background for a card. Apply Gesso to your card front with a stiff brush making hills and valleys. Then while the Gesso is still wet add small amounts of Pearl Ex with a dry brush. This creates complexity and yet a very subtle background. Once the Gesso has totally dried you may need to iron on the back to get your card stock to lay down flat. I added a stamped image that shows the texture of the Gesso along the side. The flower was stamped on 3M Transparency Film in Staz-On Black and cut out. On the reverse side of the stamped image I added color using a Marvy marker a little bit at a time.
Stamp the word Dream in black directly on the Gesso and Pearl Ex. Again add another small gold ribbon. I mean what would anything be without a ribbon? Secure the flower to card front with Diamond Glaze.

Birthday Cat


Michael Strong stamps--you can't help but love em'. This cat is so versatile. My daughter loves cats so viola! Stamp the cat in Staz-on Black. Allow to dry completely. I used a Metallic Watercolor Palette from USA Quest to add paint to the stamped image. Add small amounts at a time and dab with a paper towel if you stamped your image on glossy card stock as I did. This will allow the color to become deeper as you as layers of color and will not rub off. I used the Deckle scissors from Stampin' Up to trim out my desired size for the card front. Added a tag from my new Cuttlebug for the birthday girl-Shelly.

I Hate Snow!!


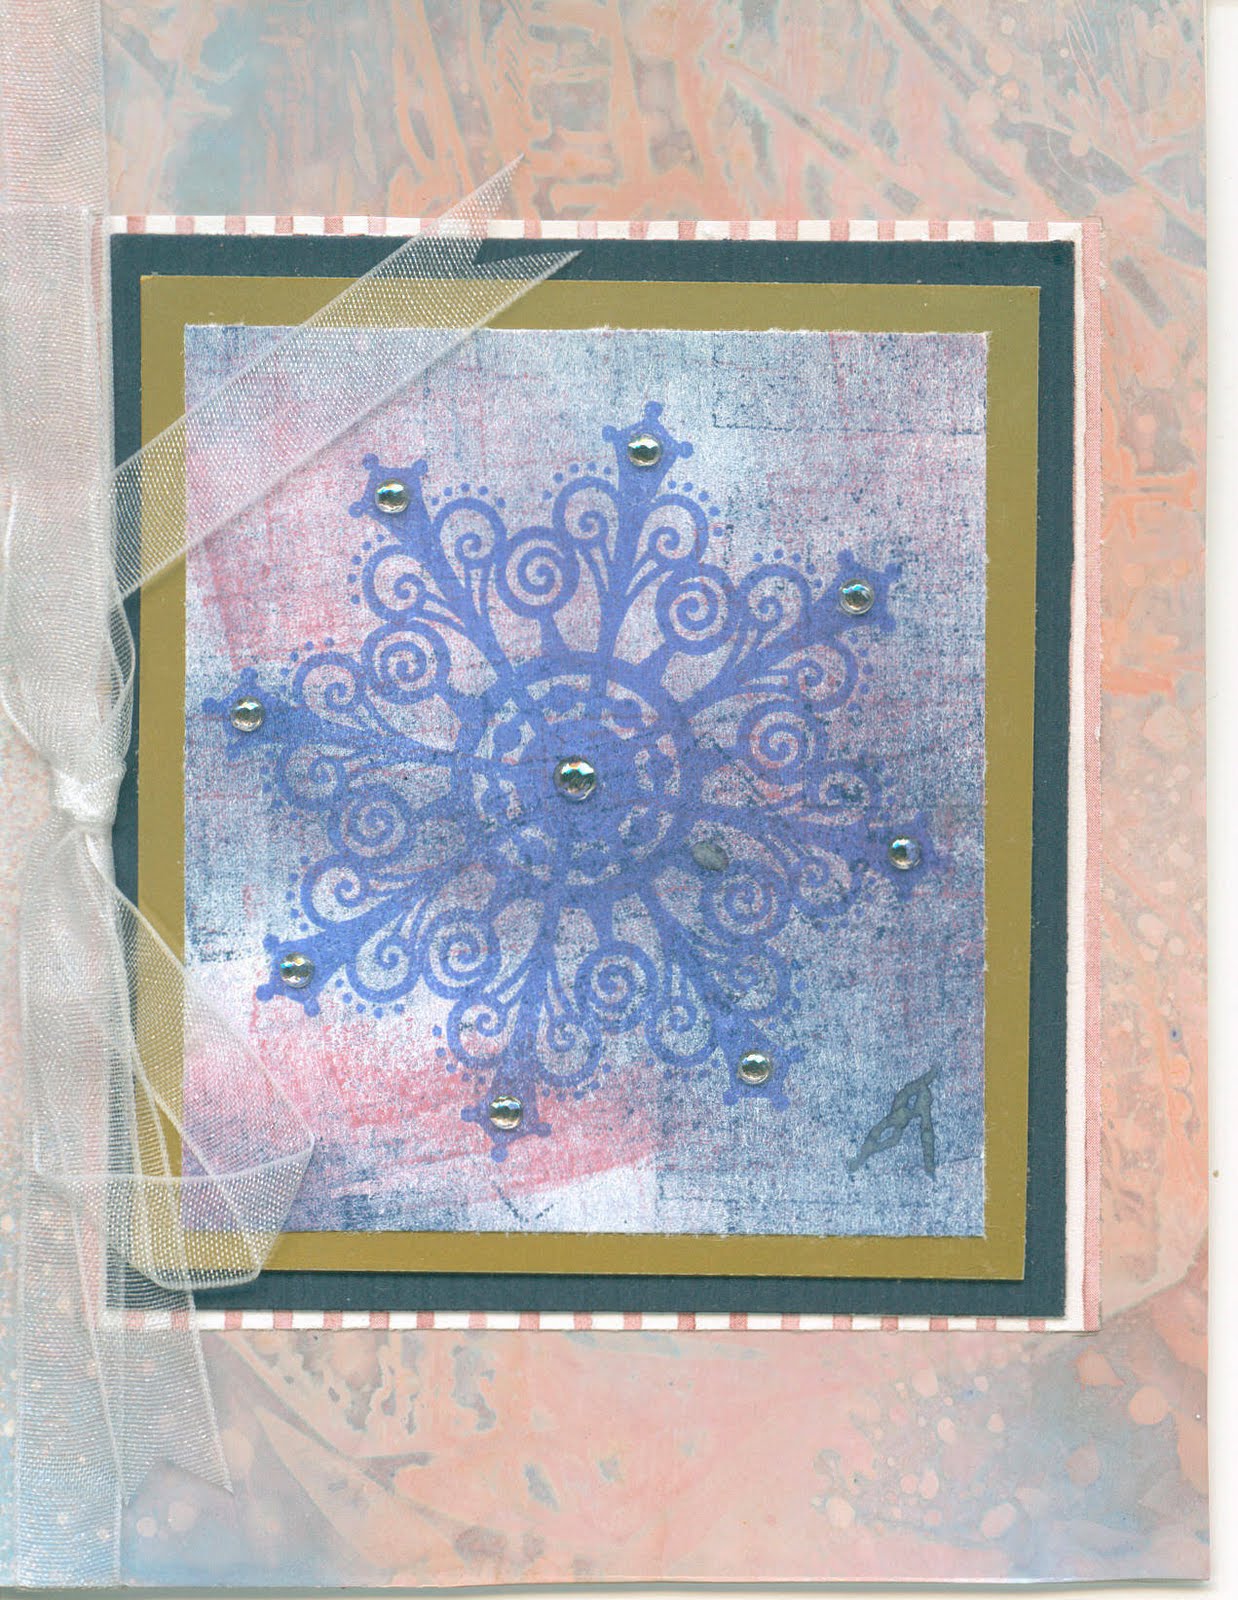
I do I really do--Hate Snow! With that being said I submit this stamped Snowflake from CTMH. The background is one I created by using an old file folder cover and reinkers with a brayer to create. With all the smooched ink in the file folder cover add your glossy card stock. Allow ink to penetrate the paper, remove and allow to dry.
Cut out your favorite pieces and set asde. Stamp the Snowflake in blue on a piece of the created background. Cut to desired size and add gold, navy and pink striped card stock 1/8 inch larger than the original piece. Add all to card front.

This kind of snowflake I can handle.

Elevated Flowers


Can't you just smell the aroma of these flowers. I stamped the image onto pink card stock in black. Twice. Then went back and added white on the outside of the petals.
Cut out the whole image once, then cut out the portion of the image you want to elevate with sticky tabs. Add over the complete image and add pink beads to the stamens of each flower. Add the stamped image to colored card stock and add to a cut piece of white card stock. And don't forget to add that lovely piece of ribbon.

Retiform-Old Gothic


I love this technique. Use a ruler and a permanent marker to add lines making different sized shapes on your card or artwork page. To stamp images into the different shapes I used a Post-It to cover every shape that I did NOT want an image to appear in. I think you will understand once you try it. This is very simple--just sound hard. I added the building to be my focal point and added the rest of the images to compliment them. You can also use a sponge and more Post-Its to add highlights to the drawn lines.

Musical Afternoon


This card was some simple yet so elegant and breezy. The background is a piece of scrapbooking paper I purchased at the dollar store. Add this paper to a piece of cut cardstock. The music is from and old music book that I learned to [;ay out off as a child. Add a piece of Red cardstock and the stamped image of a table and two chairs. Simple as and afternoon sitting under a magnolia tree with a glass of mint iced tea.
Add a ribbon.

Mystic Africa


This card was created for a missionary friend a a thank you. I used my brayer and a Kaleidacolor Rainbow pad in Autumn Leaves to create the background. I left the color of ink seperated to add a broken image. Then the African mask was stamped over the background to create the mystic of Africa. I love giraffes so they are running by to see what is happening in the backgrond Stamp each one and embosee then cut out. Elevate to complete the appearnce.

Time for Tea


This card is a compilation of many stamps each stamped and coated with embossing powder. Each image has been torn out or cut out with a different appearance to draw your eye to each image. The saying is made up and is an invitation for Tea.

"You're Invited to Tea
Just you & me
Please Come at 3:00
For its you I want to see"

Stamps are assorted companies. Enjoy!

Sunday, December 12, 2010

More Stockings


Christmas Stockings Hand Painted

These stockings were purchased at the Dollar Store and then individually painted. Each member of the family had something painted for their individual tastes and interests. Thanks to the Bass family for letting me help them out. This really was fun. I use paints that came in a set for fabrics. Enjoy!


Thursday, December 9, 2010

Hand Painted Phone Plate

My sister-in-law had a very ugly phone plate in among some really pretty pictures of old hand painted churches. One of the paintings appeared to be an old Spanish mission so I capitalized on that to paint this phone plate. The plate was purchased at Radio Shack with all the wiring on the back.


Before painting the plate I cleaned it with alcohol and allowed to dry. I penciled in the church and added all the background and trees. Then I filled in the pencil drawing of the church. After all the paint had completely dried I added the limbs on the trees that overlap the church and added the individual leaves on the willow trees. I used acrylic paints and then sprayed with a clear coating so that it can be cleaned.

Monday, October 11, 2010

Double Bugging


If you haven't tried this you-just-must. Use two Cuttlebug Folders and create one background. Card I made for a 1-on-1.

Thursday, March 11, 2010

Red Hat Hug

Have you been to Victorine Originals
if not you need to check out their stamps. This Ret Hat set was purchased from them. I love it.


This card is for a friend who has been in the hospital. I stamped the purple background with a shoe from Stampin' Up and the envelope. Used a small punch to decorate the corners for my stamped images. Then I used my Metallic Watercolours from USArt Quest. Add a red ribbon and you are ready to go. Enjoy!

Let me know what you think of Victorine Originals.

Queen Mum Nancy L

Tuesday, February 16, 2010

Oriental Birthday


I made this card using a technique from the Technique Junkie Newsletter called Outside the Box. I love this lady and painting her with my Metallic watercolors...but she is a pain to cut out. Texture and more texture. I used textured card stock for the base then added a rectangle of orange Vellum. The next layer is a very thick piece of cream Vellum. The edges were dragged along an orange/brown stamp pad.Add the lady and allow the birds and the ribbons from her kimono to extend outside the edge of the inked Vellum. Now let's add some ephemera like ribbon, oriental money and fish. Complete and ready for the mailbox.

Tuesday, December 29, 2009

Silver Joy Tree


Have you seen something that you just knew you had to make something out of it. Well I saw the base of this tree at Hobby Lobby and knew I could make something out of it. But what? I didn't buy it--but it worked on me--all day every day until I went back and bought it.

I purchased 2 8 ft garlands at the dollar store. Took them home and stripped all the leaves off. Then I painted them silver on one side. Next I stamped a fern leaf in black on each leaf. After they dried I added purple paint on the ferns. I found the purple looking beading on sale at Joann's. I stripped the plants down and cut the foam beads up in small pieces.

Starting at the bottom using E6000 glue I added two rows of the silver leaves and two rows of the purple bead sections. Working my way to the top. Then I added silver ribbon and lavendar birds.

Hoping you enjoy my Christmas creation. The complete instructions are posted on the Rubber Road

Nancy

Friday, December 18, 2009

Double Embossing


This beautiful stamp comes from Stamps Happen,Inc. Let Not our Hearts Be Busy # 80297. The image was stamped on Ivory Swirls and Twirls by Paper Piazza. I stamped it with black StazOn ink and covered with clear embossing powder from Ranger and heat set.

Next I colored in the image with my Le Plume markers and allowed it to dry. Then I went back over what I had colored for the background with Metallic EZ Gel pens by Geddes. These gel pens remain wet for quite sometime, so I covered the ink with another layer of clear embossing powder and heat set.

I used my Christmas present (A Cuttlebug) to emboss the cranberry cardstock. Then added the stamped paper with Zig glue. To highlight the berries I added red diamond like little dots that are from Darice. Next add a beautiful red bow and you are finished.

Merry Christmas Everyone

Enjoy!

Tuesday, December 15, 2009

It's the Best Time of the Year


My new stamp set from Fire Cracker Designs. Don't you just love this elf. I stamped him with my black StazOn and then colored him in with pink, purple and green. Then I made a mask to cover the elf up so that I could sponge the front of the card with a seafoam green. Then stamped the jack-in-the-box colored it and cut it out. Used pop dots to add it to the card. Stamp the saying and added it to some purple striped cardstock and glued to the card. Tied on a seafoam ribbon. I, then used my Glaze pen to highlight the spots on his pants, the gold ball on his hat and the brim.

He makes me smile just to look at him. Enjoy!