Sunday, October 25, 2009
October Is Breast Cancer Awareness Month
October is Breast Cancer Awareness Month
As a 10 month Breast Cancer survivor I want to remind each of you to have regular check ups and mammograms. And don't forget your monthly breast self exam.
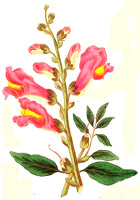
The pink rose is a digital download from Clear Artistic Stamps. I used chalks to color the digital download. The background was created using a stamp from CAS called Whispers in the Woods. This is an excellent all around use able acrylic set that should be a must have.
In honor of Breast Cancer Awareness month, Belinda at CAS will be including 5 sheets of "delicate blush" shimmer paper with each order this month for free. Stop by Clear Artistic Stamps and download this beautiful rose and see what all they have to offer.
Get your "Pinks" wherever you can and don't forget those checkups.
Saturday, October 24, 2009
Joy of the Holidays
Have you started on your Christmas cards? I have one and am pleased to share it with you. The stamp is from Stamps Happen at Janlynn Corporation. I loved the design of the stocking. I colored it with an 18 kt Gold marker and silver marker and an off white Tombow marker. Enjoy!
What's Brewing?
The stamps I used are from Stubby Stampers> What is she brewing in that cauldron? Ahhh! Maybe Green Tea. Happy Candyween to you all!
Sunday, October 18, 2009
Rubberbands and Your Brayer
Have you ever tried wrapping rubberbands around your brayer and then rolling it in ink? Well I hadn't so I decided to try something new to me. I used size 16 rubberbands from Alliance. We keep these on hand all the time for whatever. My first sample I wrapped 4 rubberbands around my rubber brayer. Then rolled the brayer in Autumn Terracotta ink from CTMH making sure that I didn't get ink on the edges of the brayer.
I first did long strokes to cover the glossy cardstock with ink then went back and only put ink half way up the cardstock. The stamp set I used is Autumn Memories from Clear Artistic Stamps. The stamp and the background remind me of the book Wind in the Willows.
For my next project I wrapped the same size rubberbands around the brayer and applied Desert Sand ink from CTMH. This time I made sure that the edges of the brayer were heavily coated with ink to create a different background on the glossy cardstock.
In viewing this background I saw some roads crossing and leaves being blown in different directions. So I have the perfect stamp set from Clear Artistic Stamps Whispers in the Woods.
In the fall nature provides us some of the most beautiful colors ever. I created a road lined with beautifully colored trees. I stamped some of the tree tops on plain cardstock and some on patterned cardstock and then cut them out. All of the tree trunks were stamped on desert sand cardstock and cut out.
Try this interesting technique and see what you come up with. Remember each artist has their own interpretation of what they see. Maybe you didn't see a couple of roads and leaves blowing in all directions. What did you see? Leave me a comment and share your thoughts.
Thursday, October 8, 2009
It works as a Gift or a Decoration
I love candles and candles love me! Vanilla ones that is! I love to decorate them and group them together with the same designs in a large white china serving dish I bought at Dollar General for $3.00. Then I head for the Dollar Store or the Dollar Tree. Getting my drift here? This can be very reasonable and very appealing to the eye. These also make great gifts for the holidays, a new neighbor or even a new home gift.
The stamps I used are from a set called Autumn Memories from Clear Artistic Stamps.
Stamp a piece of tissue paper and then cut to fit the small candle that you see. Add it to the candle by heating with an embossing gun. Make sure that you do this in short bursts because you will burn a hole in the candle. The tissue paper will not burn because it is saturated with the wax.
For the larger candles cut three pieces of paper/cardstock to fit around your candle adding an extra 1/2" for gluing. Each piece of cardstock should be 1/2" smaller in width than the one before it. You can add all kinds of ribbons or charms for added decoration.
Give it a try and get ready for the Holidays.
Enjoy!
Nancy
Subscribe to:
Posts (Atom)